

Handcrafting reliable, custom leather goods & gaming accessories.
Wednesday, July 30, 2014
Paper Making Round 5
This is one of those cases where a little modern technology makes a dramatic difference. One cheap blender later the paper's coming out much more uniform. It's coming along much faster now too, so fast that I tried two types of pulp this week. The lower batch of pages was made with printer paper and the upper batch was made with junkmail. I'm probably more amused than I should be that the junkmail is essentially cardboard. I'm imagining it'll be handy as book binding and structural stuff and I'm fairly happy with it as is. The recycled printer paper could stand to be a bit more even, and even a bit thinner. I tore a chunk off one sheet just to see how the grain's aligned and it's less random than I'd suspected. This leads me to conclude that the fibers tend to naturally line up along a grain, probably due to some feature of their structure. Of course, I don't have any way to test that hypothesis objectively (yet), but it's an intriguing notion. At this rate I expect to be hitting upon a product-worthy process in 2 or 3 more rounds.

Monday, July 28, 2014
Manual Paper Making Round 4
This week I played with going back to printer paper and using saline rather than water. This was another improvement, but I figure that's more from using printer paper than adding salt to the water. Near as I could tell, the saline didn't really make any difference. I gave the pulp two rounds through the mortar and pestle and doubled it up in the mold and that's helped improve the quality of the result, but still not quite where I want to be. If it sounds like I'm piling too many variables into one experiment, I probably am but it's all made necessary by the time constraints.
This latest round has persuaded me that recycling paper sans blender is certainly possible, but it isn't exactly practical. Since I'd like to churn out useable paper on a fairly regular basis, and I can't spend a week making 2-4 sheets at a time, I've sprung for the simplest blender I could find. For Round 5 I expect to have something closer to what we'd normally consider note-worthy paper.

This latest round has persuaded me that recycling paper sans blender is certainly possible, but it isn't exactly practical. Since I'd like to churn out useable paper on a fairly regular basis, and I can't spend a week making 2-4 sheets at a time, I've sprung for the simplest blender I could find. For Round 5 I expect to have something closer to what we'd normally consider note-worthy paper.

Friday, July 25, 2014
Leather Trading Cards
My wife and I have been meeting with a bunch of friends every
Wednesday evening for a rousing game of Dungeons & Dragons for going
on two years now. It's been a bit of a running joke that our Rogue
frequently forgets to check doors and rooms (and everything else for
traps). For those not familiar with D&D, this is a bit like a
politician forgetting to ask for votes. So as a joke I'd made him a
little "reminder" card politely asking if he's checked for traps
lately. He's quite pleased with the card, even keeps it right next to
his dice while we play, and hasn't forgotten to check for traps since.
It's since occurred to me that there's probably all sorts of scenarios where a person might find a custom tooled 2.5" x 3.5" piece of leather handy to have around. So I was excited to add them to the store. It's the first "Made to order" item I've posted to date (though it won't be the last) and I forsee good things with it.


It's since occurred to me that there's probably all sorts of scenarios where a person might find a custom tooled 2.5" x 3.5" piece of leather handy to have around. So I was excited to add them to the store. It's the first "Made to order" item I've posted to date (though it won't be the last) and I forsee good things with it.


It's all in the eyes

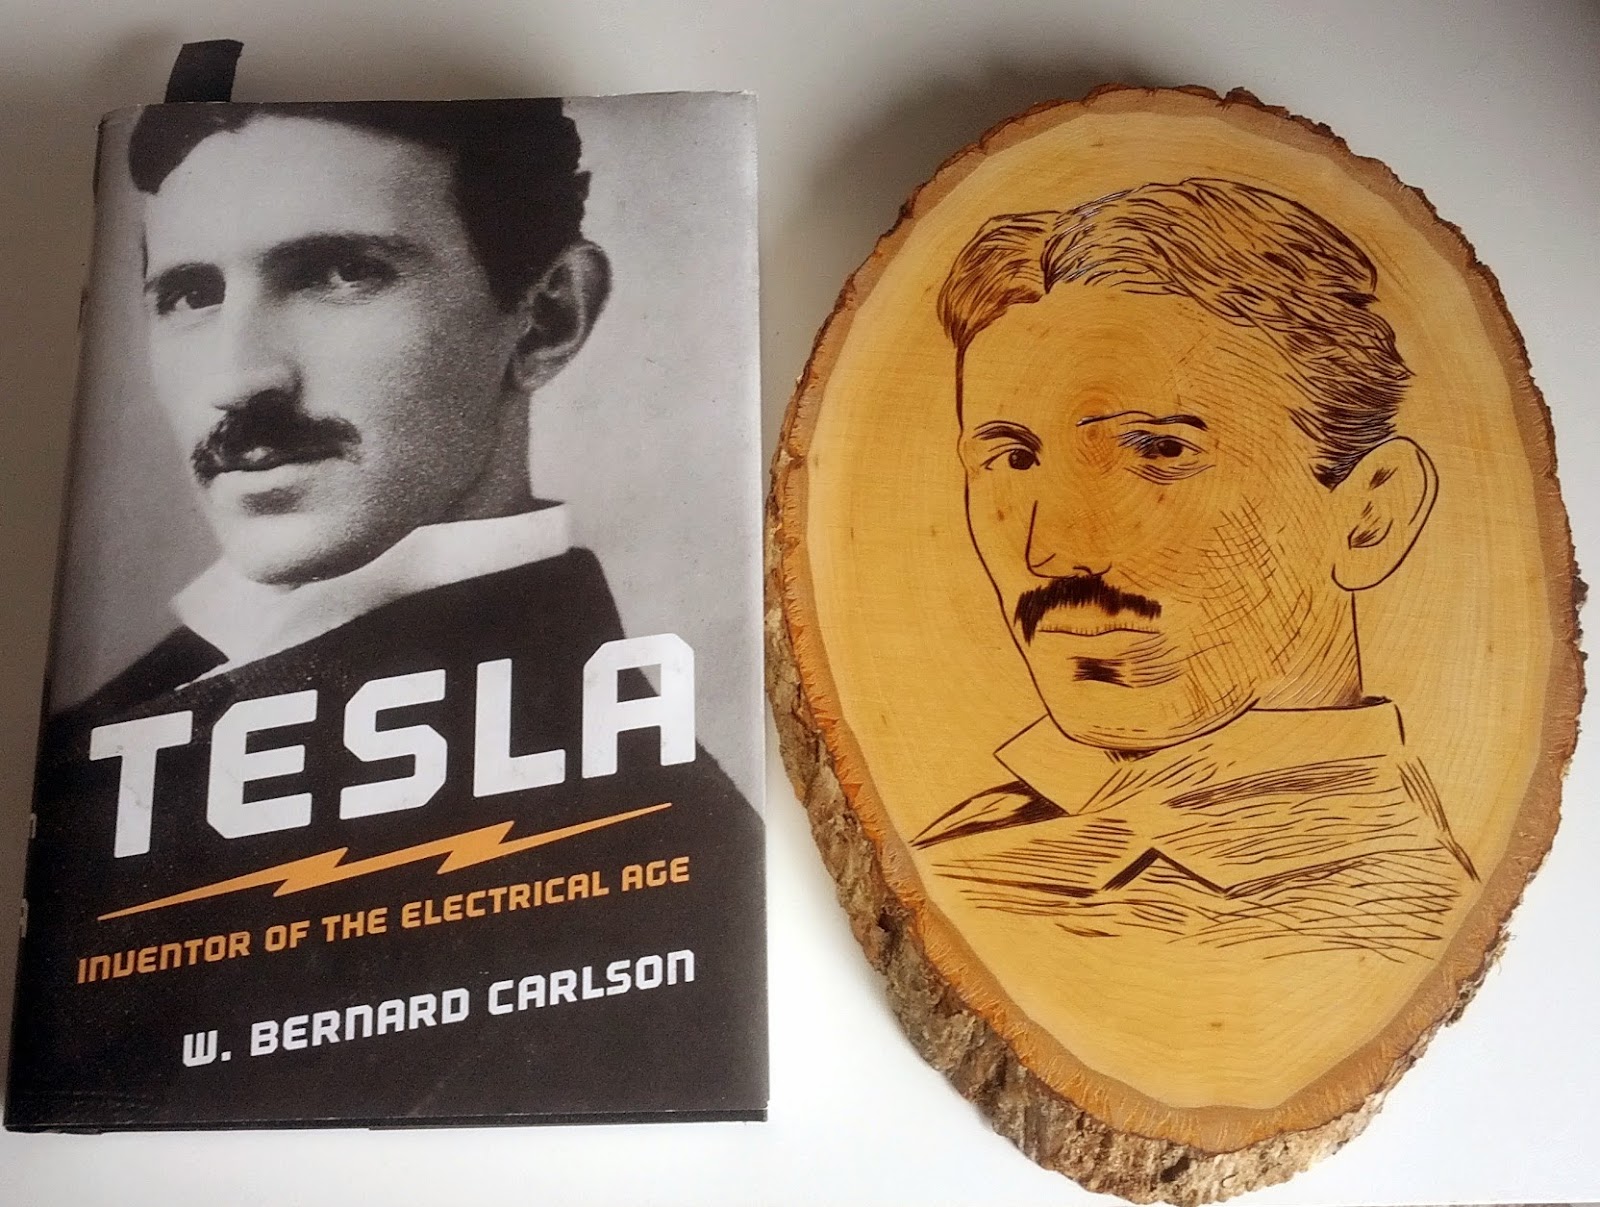
The burning itself went just fine. Four hours of careful attention and all I had left were the eyes. So naturally that's where things went squirrely. The left iris wound up at a different angle than the right iris, giving him a sort of cross-eyed look. I feel pretty foolish for making such a simple mistake, but there's not much that can be done about it now. I might try again later at some point, but in the interim this project'll have to go to the Not For Sale bin.
Monday, July 21, 2014
Manual Paper Making Round 3
These seem to be falling into a weekly cycle, entirely by accident. As it happens, tearing up the paper, mashing it, and forming it into sheets each take about a half hour to an hour. This block of time just about matchs what I have available while I'm waiting for something (usually glue or stain) to cure so that's generally when I get to work on this.
This last week I took the other half of that junkmail, shredded it and let it soak for a couple days before I did any masticating. It occurred to me that the classic tool to use for mastication would be a mortar and pestle. I picked one up easily enough and I played around with using it on the paper this round. I'm not sure if the results are very clear, but the paper is certainly a better quality. I'm still waiting for it to dry but so far it seems a good deal more consistent.


I think this week I'll switch back to using printer paper scraps. I'm also curious to see if saline might have an effect that water alone doesn't. Sounds like a pretty good experiment to me.
This last week I took the other half of that junkmail, shredded it and let it soak for a couple days before I did any masticating. It occurred to me that the classic tool to use for mastication would be a mortar and pestle. I picked one up easily enough and I played around with using it on the paper this round. I'm not sure if the results are very clear, but the paper is certainly a better quality. I'm still waiting for it to dry but so far it seems a good deal more consistent.


Sunday, July 20, 2014
A Viney Bangle
Some days ago I'd received a request to make a bangle with a "vine" design. A bit of a loose specification but not anything I haven't done before. I briefly considered an intricate pattern that would've covered the entire bangle in vines and leaves. Then I recalled the 8-9 hours it takes to complete the round braid along 14" of edging. Heavy tooling would've had a pretty hard time surviving that, and probably wouldn't have been too visible from a distance anyway. Maybe next time. =)
The design was hand cut in the end and I used a mix of Saddle Tan antiguing gel and a finishing agent to do the staining. Because the impressions were so deep you can really see the contrast between the grain and the tooling.
When it came time for the photography I took one set in the light tent and another set on my workbench (which has ample natural light). I've noticed that the light tent seems to dampen down the colors of whatever I photograph inside it, or at least those items seem much more vibrant when photographed in natural sun light. This is probably the sort of thing I could fix in post editing once Android allows images to be saved in RAW format, but I'm not sure when that change is expected.


Thursday, July 17, 2014
Dog Collars
It seems like dog collars are one of those practically requisite
leatherworker items that everyone has to make at some point or another.
There was a time, not even that long ago, when just about everything in
daily life was made with leather. Now we have fabrics and "artificial"
materials that have replaced leather for a great many items. Of
course, there's still a few items where leather's the top dog of
materials.
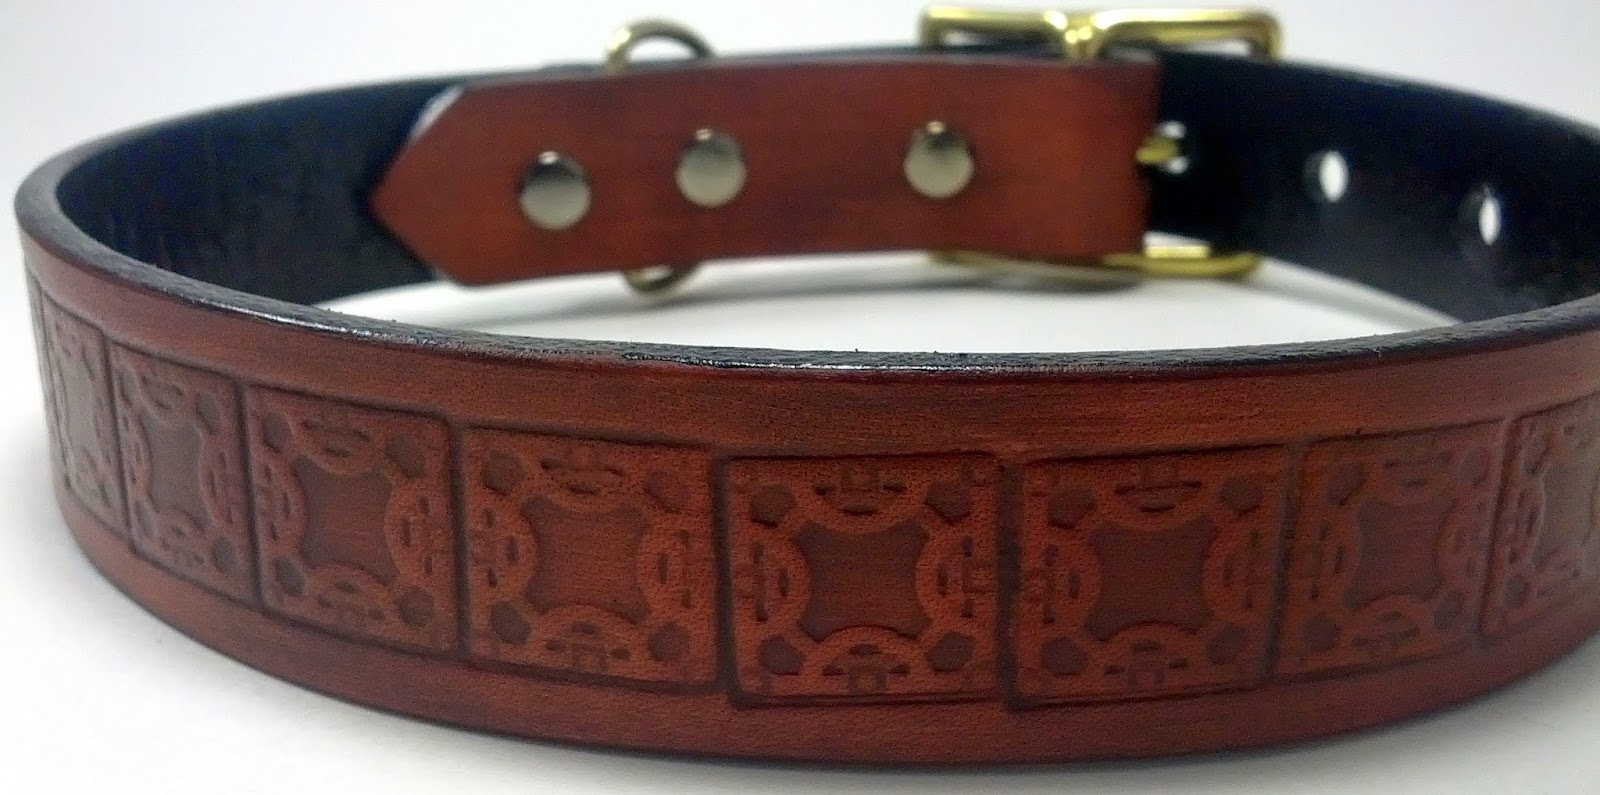
I'll admit that I got the general notion for the pattern from a google image, and the basic measurement to start with came from an instructable article, but the rest of these were made with just whatever I felt like doing at the time. Studs aren't something I get to use nearly often enough and I had some fancy, dancy "ironwork" stamps that I wanted to test out. So badda bing, badda bang. Now I just outta braid some dog leashes to go with them =)


I'll admit that I got the general notion for the pattern from a google image, and the basic measurement to start with came from an instructable article, but the rest of these were made with just whatever I felt like doing at the time. Studs aren't something I get to use nearly often enough and I had some fancy, dancy "ironwork" stamps that I wanted to test out. So badda bing, badda bang. Now I just outta braid some dog leashes to go with them =)


Monday, July 14, 2014
How old is Leatherworking?
I have about a dozen books on differing aspects of leatherworking. I have books on braiding, tooling techniques, tooling styles, stitching, etc but aside from the material each and every one of these books shares something in common. They all have a paragraph or three near the start of the book describing leatherworking as humanity's oldest craft. They usually paint the picture of the hypothetical "caveman" stitching together animal hides as the earliest instances of the craft, long before we as a species were forging metals or making bows.
Based on our modern concept of anthropology this statement, that leathercraft is humanity's oldest craft, seems a bit debatable. For one thing, the concept of the caveman slouching in his cave all his life long, whacking mates over the head with a club and carrying on like a primitive college student is a bit outdated. Early humans did sometimes live in caves, but it doesn't seem that they did so permanently. All of which led me to wonder if this wasn't just a common marketing trope for leatherworking books. Or could there be evidence suggesting that leatherworking was humanity's original craft? Just how old is leatherworking anyway?
The usual given example of primitive leatherworking is the fashioning of clothing from animal hides. These hides would have had to have been removed from the carcass, preserved in some manner (probably scraped with a tool and sun dried), and then cut and sewn together to form clothes. Unfortunately materials like this don't tend to last for thousands of years so we don't have many, if any, specimens for direct study or evidence. But these crafts still required tools, and perhaps those would last a bit longer. The oldest reference I could find, for say, a needle was about 62,000 years ago. Weaving doesn't seem to have been invented until about 12,000 years ago so it seems reasonable to expect that these ancient needles were used mostly on hides.
A pretty interesting study released by the University of Florida analyzed lice to learn more about our history. They concluded that homo sapiens probably began wearing clothes around 170,000 years ago. This corresponded with a period of global cooling and with homo sapiens migrating into colder climes. It makes sense that as a mostly hairless, bipedal ape was more regularly exposed to adverse environmental conditions, clothing would give them an advantage in survival and reproduction.
But before that, was homo sapiens just wandering about naked everywhere? Possibly, but homo sapiens as a distinct species is only 200,000 years old. And it didn't just spring fully formed from the ground, ready to start forming tools and hurling spears. There were at least a dozen species of homo that populated the Earth long before homo sapiens began walking around. We can't study them via their parasites because those parasites died out with them, but we can study their tools.
Homo erectus is the oldest species of the homo genus, at least according to the Smithsonian, and these days that classification includes some previously discovered subspecies like homo ergaster, whose name means "Handy Man". Homo erectus lived about 2 million to 174,000 years ago and was probably the first of our ancestors to migrate out of Africa and into Asia. They're generally known for being the first to be bipedal, routinely use fire, and fashion their own tools. The oldest of these tools are classified as Oldawan, or "Mode 1" if you're feeling less fun, and include a variety of tools with eminently practical names like chopper and scraper. This category also includes primitive stone awls. And microscopic studies of the tools has shown that they were indeed used to work animal hides (and wood). If you were to distil the tools I use today down to the very basic fundamentals, there are direct corollaries in these Oldawan era tools. The description of "discoid" tools certainly sounds a lot like a head knife to me.
A needle is noticeably absent from this list but even if these hides aren't being stitched together, at least in the classical sense, I would still argue that this is leatherworking. You may not be tooling, tanning (a process that seems to have been invented by the Egyptians in 1300BCE), or stitching the item but the leather still has to be processed and worked to be turned into a usable material. And the thought that leatherworking itself might be older than our species is an interesting and humbling one.
But it may go even farther than that. An excavation in Bouri, Ethopia is turning up stone tools that date back to 2.5 million years ago. That would be 500,000 years before the homo genus seems to have developed. The species that seems to be associated with these tools is Australopithecus garhi, a species that predates homo erectus by at least 500,000 years. If humanity is defined as referring specifically to "Man", then the classification system tells us that australopithecus predates humanity. It's more a semantic point than a practical one but it seems likely that these earliest tools were used for working leather more than anything else. If that's the case then leatherworking could indeed predate humanity itself.
Would that then make it the oldest craft? I would say probably not. Fingers and teeth are probably poor substitutes for a knife or awl. So you would need tools to work the raw hides even if they were fashioned from a pebble. Before you could develop leatherworking you would need stoneworking to make the tools necessary to process and manipulate the hides. But the development of leatherworking would have been a technological revolution on the same scale as the industrial in terms of what it enabled. Now you could bind sticks together with rawhide (which seems to have been common practice before nails). You could form containers for food and water, allowing you to range farther and store them for longer. You could construct better shelters to shield against the elements. And, not by any means the least, you could begin make clothing.
In the RTS terms of my generation, Leatherworking is the second tier tech that needs to be unlocked before you can get to woodworking and exploring and way before agriculture and writing. It's so basic and fundamental that it's easy to take for granted and it's hard to visualize these time scales. So in case this wall of text was tl;dr I'll try to condense it down into an XKCD style graph.
 |
| Timeline of the development of crafting disciplines |
Sunday, July 13, 2014
Manual papermaking Round TWO!
After the first experiment I revised my process a bit and figured I'd try it out with a somewhat less processed variety of paper. I used a material we all have a veritably endless supply of: junkmail. This time around I'd picked up a one gallon bucket just so I'd have a receptacle for water other than the vat, and it makes measuring out 1 gallon of water (which is a controlled variable for these experiments) pretty simple.
I shredded half the flyer by tearing it into 1 cm strips and then tearing those (usually 4-5 at a time) into 1-2 cm chunks. This resulted in, essentially, a vat full of confetti. Once I added the water I wadded it all into a big ball again and used my fingers to break it all down. There were still a few larger chunks left shifting around but on the whole it worked relatively well. That was about all I had time for though and after dumping everything into the bucket it spent 5 days sitting in a corner (covered, fortunately). The next time I had a chance to work on it it looked like this:
That cloudy, grey mass in the bottom of the bucket is all the saturated paper fibers all settled in the solution. The water is noticeably darker at this point, presumably from the ink that's been loosened from the fibers and is floating freely.
I managed to use every last bit of pulp this time and wound up with 4 sheets of paper. The last sheet was made by pouring the pulp from the vat, through the mold, and into the bucket (pretty messy but easy to prepare for). This last sheet wound up being the thickest of the four and probably the closest to what I'd eventually like to achieve. The third sheet I put on an embossed sheet of felt to see if it'd form to design. Surprisingly enough, it did, though not well enough that it'll come out in the photos.
I let them airdry this time around, at least for a few hours. After that two of them had dried just about completely (though they were a little warped) and I put those two under a couple books. Of the other two I left one out in the open and one under a book.
The following morning I found that the one left on it's own had dried completely but warped in the process. The two that were dry before going into traction were a bit crinkly. The one that was still a bit wet when it went in traction was mostly dry and perfectly flat. So assuming it stays flat going forward I think I have a technique for that.
Relative to that first patch, these were a definite improvement but there's still a ways to go before I've got a good, proper sheet of paper. I think these were probably too heavy on the ink and that's caused some discoloration in the end result. Not a lot, but just a little. There's also all those unbroken chunks of scrap paper. Not as many as the first batch, but still a fair few. I'm pondering some sort of "mechanical mastication", something like a hand-cranked egg beater or interlocking gears. It's occurred to me that the blender is indeed exactly that, but I'd still like to avoid blades and electrons if I can.


I managed to use every last bit of pulp this time and wound up with 4 sheets of paper. The last sheet was made by pouring the pulp from the vat, through the mold, and into the bucket (pretty messy but easy to prepare for). This last sheet wound up being the thickest of the four and probably the closest to what I'd eventually like to achieve. The third sheet I put on an embossed sheet of felt to see if it'd form to design. Surprisingly enough, it did, though not well enough that it'll come out in the photos.
I let them airdry this time around, at least for a few hours. After that two of them had dried just about completely (though they were a little warped) and I put those two under a couple books. Of the other two I left one out in the open and one under a book.
The following morning I found that the one left on it's own had dried completely but warped in the process. The two that were dry before going into traction were a bit crinkly. The one that was still a bit wet when it went in traction was mostly dry and perfectly flat. So assuming it stays flat going forward I think I have a technique for that.


Saturday, July 12, 2014
Prototype: Wallet of Holding
My wife, glorious person that she is, has been using the same
battered, beaten, worn old cloth wallet since she was old enough to tell
quarters from dimes. That was quite some time ago though so the thing
is more worn out than Scrooge's ratty old coat. She's been asking me to
make her a leather one for awhile, and at first I made one from a kit,
but neither of us were very happy with it. This time she furnished the
original wallet itself so I could reverse engineer it.
The geometry is a fair bit more complicated than most wallets tend to be. To look at the insert it seems like a simple trifold but it's actually two interlocking "V"s that hold a zippered pocket between where they overlap. That zippered pocket is what makes this design relatively unique and it's exactly what she likes about it. It's where she keeps all those quarters and dimes.
It took a fair while to grok the entire geometry, and being a prototype it didn't come out perfect. The insert came out a 1/4" too long and had to be trimmed and there were some hidden aspects of the card pockets that I wouldn't have been able to see without dismantling the old wallet. But this is why we make prototypes, to figure out the surprises ahead of time. In the meaning time, it's a perfectly fit and stable wallet and she seems content with it so I'm content with it. I'll probably modify the design a bit if I choose to use this pattern as a line of products, but now I have all the information I'll need to do so.


Wednesday, July 9, 2014
Leather Necktie with Gold Gears and Bolo Cord
Maybe it's just me but I derive a sort of amusement by making
neckties with leather. It's an opportunity to make something my brain
associates so strongly with stuffy, unpleasant formality in about the
least formal sort of way I can think of.
Bolo cords have been used to make "western neck ties" for... actually I don't know how long but maybe someday I should find out. It's just a braided cord that runs through a clip, sometimes no more complicated than a paper clip. My "innovation" was only in sticking a necktie-shaped piece of leather to that clip. I have to put "innovation" in quotations of course because I got the idea from a book published in the 50s by F.O. Biard. So clearly it's not a new notion, but it's been long enough that it's probably new again.
This will probably be the extent of what I can list this week simply because I'm simultaneously working on an unrelated, far more complicated project for my wife. If I'm very lucky I might be able to finish that by the weekend and if it works well I'd say there's a pretty decent chance I'll employ the pattern again for the shop. A couple of parts of that project snuck into one of the pictures for the necktie, maybe if someone can guess what it's going to be I can come up with some sort of prize for them. =)


Monday, July 7, 2014
First attempt at recycling paper sans blender


Anyone who googles "recycle paper" will find all sorts of youtubes and how tos on how to turn old scraps into reusable paper. The basic process is pretty much the same everywhere you go though:
- Tear paper into scraps
- Use a blender to turn scraps (and a fair amount of water) into pulp
- Pour pulp into a mold (generally in a vat full of water, this keeps the pulp relatively even)
- Remove pulp from mold and let it dry
There are some variations in approach to the molding and drying processes but those are the nuts and bolts and it makes a certain sense. Paper is made up of wood fibers that have been ground up and stuck back together. Saturating the fibers and masticating/blending them breaks those bonds and you wind up with lots of little wood fibers floating around in the water (along with ink, graphite, and probably a bit of bleach and other chemicals used to turn paper white). These fibers are the end all, be all of paper and, to my mind, the longer the fiber, the stronger (and arguably better quality) the paper. This is my hypothesis at least, though a comparison of japanese (very long fibers) and european (very short papers) paper seems to suggest such.
So if I were attempting to maintain as much of the fibers as possible then putting the pulp through a blender seemed somewhat counterproductive. At the same time, I try to avoid using a power tool (like a blender) if it doesn't offer a clear advantage over trying to do the same task manually. In this case, there's the apparent fact that a blender can reduce a few sheets worth of paper to pulp in 10 seconds or less... but I wasn't really sure that the blender offers any other benefits.
So my plan was to follow this process but instead of using a blender I would attempt to masticate (to clarify, I mean 'to tear/grind' rather than 'to chew') the paper by hand. Tearing the paper into scraps took a surprising amount of time and for this first attempt I was just using old printer paper scraps. Since this paper is so heavily treated and the fibers so short to begin with it's a bit of a worst case scenario, but it gives me a place to start. The scraps of about 4 sheets worth of paper went into a vat with about 1.25 gallons of water. I attempted to break them up further at first by just stirring the vat (which didn't work at all really). Then I clumped whatever I could handle into a giant wad of soggy paper and ground that up between my fingers. This worked surprisingly well but still left some fairly large scraps and wasn't something I could try multiple times.
After that the vat, with it's watery mixture of saturated free fibers and clumps of paper scraps, sat untended for 2-3 days just because I didn't have time to do anything else with it. Once I had an hour to spare I was able to strain enough pulp out of the vat for three sheets of paper. After giving them a day to dry they're somewhat crude as paper goes, all bendy and lumpish and uneven, but a pretty valid first attempt. The larger scraps are still in there and several of them still have the ink or graphite they had when they went in so there's some spots as well. It's paper though, and a very informative first attempt.
Next I'm going to try roughly the same process (I've some notions on how to refine some of the details) with newspaper and see how that works out. The fibers seem to be longer and the paper's far less chemically treated so maybe it'll work better. Hopefully I can find out soon.
Sunday, July 6, 2014
New Plate for Messenger Bag
This wasn't done to be sold to anyone, but it turned out pretty well
all the same. I've had one of those Bag of Holding messenger bags from
Thinkgeek almost since they started selling them and when I started
leatherworking I used the leather from a starter kit (originally meant
for a checkbook and wallet) to make some plates that I stitched onto the
lid the of the bag. Those plates were complicated and intensive and
they weren't perfect but they were the very best I could do at the time.
Of course, that time was some years ago. The picture above was taken when these plates were brand spankin' new and in some of the subsequent pics you'll see how they've weathered over time. Now a days I can accomplish a fair bit more with my leatherworking. I wanted to keep the upper plate, it's mingling of lone star and gears and triweaves just appeals to me, but figured I could replace the lower plate with something more indicative of what I can do now.
Working over the weekend, I made one "draft plate" that tested the design I had in mind but didn't really turn out as nicely as I wanted. But from that I figured that what I really wanted was an overlay, two layers of leather that overlapped to form the desired design. I kept the triweave and the gears and I replaced "Bag of Holding" with my maker's mark because all of these things seemed entirely appropriate. And here's what I got:
Just for bemusement, here's the "draft" plate and the old "bag of holding" plate. I really like how it's weathered over time but I can't say I'm too sorry to see it go. =)


Subscribe to:
Comments (Atom)