There's a rhythm that usually comes with each New Year. The holiday crunch usually starts in late October or November and then carries through late Dec/early Jan. Then things usually taper off and I get a chance to recover, maybe work on some side projects or prototypes. That hasn't happened this year, largely due to a couple of large orders (worth it) and a pretty steady stream of work. That's not a bad thing per se but I haven't figured out how to balance ~80 hour work weeks with less urgent tasks like keeping up with the blog/social media. And before I know it it's been three months since I've posted anything. =)
I shipped the last overdue order a couple of days ago and I was looking forward to taking some time off for a long overdue break. That very day Etsy announced their Offline Ads program. This isn't the place to get into the weeds on that (there's a great break-down here: https://community.etsy.com/t5/Marketing-Your-Business/Etsy-s-Offsite-Ads-fact-thread/m-p/129563718#M1743899) but the long and short is that Etsy's decided to add a really high fee for something they were already doing with smaller fees. And for shops that achieve a certain level of success they can't opt out, whether this service is at all helpful or not. In essence, it's a naked cash grab against the seller community. This particular program came out of nowhere but Etsy's been raising its fees for awhile now. If they choose to prioritize short term profit over the seller community that's their prerogative but just looking at the numbers it's hard to me to see the business sense in staying on their platform.
Not that I'll be closing down or anything either. It right now it looks like I'll move the shop over to an independent website, probably sometime in late March or April. But there's a lot to do before I can pull that off so it looks like that break'll have to wait.

Handcrafting reliable, custom leather goods & gaming accessories.
Showing posts with label Announcement. Show all posts
Showing posts with label Announcement. Show all posts
Friday, February 28, 2020

Saturday, July 20, 2019
Free Shipping
I've made a few changes to the shop over the past few days but by far the biggest has been including the cost of the postage in the initial price of each item. That allowed me to zero out the shipping cost on every item in the shop. I had experimented with this model in the past but Etsy is making some clear moves towards making this the standard so it seemed worth a try. The only orders that will see any shipping cost now are orders headed somewhere outside US/Canada that weigh more than 1kg. And International buyers still have the option of ordering expedited shipping if they'd like tracking.
Updates
New Listings
Updates
- Range Card Holsters now have an option to select Belt Loops or Belt Clips
- All 5e and Waterdeep coins have had their images updated
New Listings
- Mini DM Screen: https://www.etsy.com/listing/708996442/mini-dungeon-master-screen
- Bag of Holding: https://www.etsy.com/listing/722795173/dnd-bag-of-holding
Wednesday, July 10, 2019
New D&D Props
We're just about to start running the Waterdeep: Dragon Heist campaign and I may have gone a little overboard in building props for this new campaign. Many of these could well be prototypes for future shop products but just as many were just about trying new things and/or making something I figured would be useful.

* Map of Faerun - Because why not? The Sword Coast has too many place to keep track of and even if this campaign won't leave Waterdeep I like having maps at hand. This one was pretty easy since I just engraved Deven Rue's awesome map on some pigskin and added some blue to the bodies of water.
* Spell Cards & Case - This one took awhile. Not as long as it should have, but still awhile. There's a PDF kicking around the internet with all of the SRD spells so then I just had to make cards for all the other spells in the books we already own. And because I'm me I drew a fancy back for each card and built a chest to hold them all.
* Forgotten Realms Calendar - I've been trying to figure a way to show & track date-time information at the table for ages. I don't have the sense it's important to most campaigns but for various reasons I often need to track the phase of the moon or some PC's logistical what-not. And in Dragon Heist I understand time and date are pretty relevant. So this calendar has a wheel for time of day, month, and day and all of them are pretty easy to rotate and use. I burned the holidays in Waterdeep on the base just because I'm a nerd like that.
* Initiative Tower Name Tags - Everything else here took at least several hours to pull together, most of them a few days. The Name tags took maybe 15 minutes but they're what the other players remarked on the most. Go figure. =P

And on top of all of that there was one prop that... hasn't turned out so well. I wanted to make a topographical map of Waterdeep and really push at the boundaries of what I've been able to do with the laser cutter so far. I spent a lot of time drafting, tweaking, and calibrating and my initial results were looking pretty promising. Then I spent two days and most of a side of leather making the full thing and... yeah, I'm not happy with it.
There's a few things going on here but it fundamentally breaks down to image processing and material. The first is pretty complicated but essentially, the more the image is processed the clearer it burns but the less detail it has. The balance I'd struck in small scale didn't work great at large scale. And as for material, to make a map so large (18x36") I had to cut it into 27 pieces across 4 different layers. It took a ton of leather to make this thing but as a material leather's pretty dynamic. It warps and stretches and curls. Peices that are laser cut to fit together perfectly just won't. It was really frustrating.
I still have all the raw work that went into drafting and I'll probably revise that to make a smaller map out of plywood, probably closer to 12x24". And if that comes out well, maybe that's something that can go one the shop.

* Map of Faerun - Because why not? The Sword Coast has too many place to keep track of and even if this campaign won't leave Waterdeep I like having maps at hand. This one was pretty easy since I just engraved Deven Rue's awesome map on some pigskin and added some blue to the bodies of water.
* Spell Cards & Case - This one took awhile. Not as long as it should have, but still awhile. There's a PDF kicking around the internet with all of the SRD spells so then I just had to make cards for all the other spells in the books we already own. And because I'm me I drew a fancy back for each card and built a chest to hold them all.
* Forgotten Realms Calendar - I've been trying to figure a way to show & track date-time information at the table for ages. I don't have the sense it's important to most campaigns but for various reasons I often need to track the phase of the moon or some PC's logistical what-not. And in Dragon Heist I understand time and date are pretty relevant. So this calendar has a wheel for time of day, month, and day and all of them are pretty easy to rotate and use. I burned the holidays in Waterdeep on the base just because I'm a nerd like that.
* Initiative Tower Name Tags - Everything else here took at least several hours to pull together, most of them a few days. The Name tags took maybe 15 minutes but they're what the other players remarked on the most. Go figure. =P

And on top of all of that there was one prop that... hasn't turned out so well. I wanted to make a topographical map of Waterdeep and really push at the boundaries of what I've been able to do with the laser cutter so far. I spent a lot of time drafting, tweaking, and calibrating and my initial results were looking pretty promising. Then I spent two days and most of a side of leather making the full thing and... yeah, I'm not happy with it.
There's a few things going on here but it fundamentally breaks down to image processing and material. The first is pretty complicated but essentially, the more the image is processed the clearer it burns but the less detail it has. The balance I'd struck in small scale didn't work great at large scale. And as for material, to make a map so large (18x36") I had to cut it into 27 pieces across 4 different layers. It took a ton of leather to make this thing but as a material leather's pretty dynamic. It warps and stretches and curls. Peices that are laser cut to fit together perfectly just won't. It was really frustrating.
I still have all the raw work that went into drafting and I'll probably revise that to make a smaller map out of plywood, probably closer to 12x24". And if that comes out well, maybe that's something that can go one the shop.
Printer Upgrades
I've had this printer for nearly two years now and for most of that time it's been cranking out coins and other prints like a friggin' champ. So I can't be too disappointed when it finally ran into a few issues recently.
A full accounting of the maintenance and troubleshooting would make this post a book but by the time I was done I'd swapped the old print head for a new, upgraded model. And it's spinning up great! The prints are coming nice and quick and with far fewer failed prints.

As part of this whole process I updated the models for the 5e and Waterdeep coins. My filament supplier's been changing their stock this year too so a few coins have had some color changes. The CP is the only one that's had a "drastic" change but it was the closest I could find to it's original color. The Etsy listings have all been updated with photos of the current models/colors.
A full accounting of the maintenance and troubleshooting would make this post a book but by the time I was done I'd swapped the old print head for a new, upgraded model. And it's spinning up great! The prints are coming nice and quick and with far fewer failed prints.

As part of this whole process I updated the models for the 5e and Waterdeep coins. My filament supplier's been changing their stock this year too so a few coins have had some color changes. The CP is the only one that's had a "drastic" change but it was the closest I could find to it's original color. The Etsy listings have all been updated with photos of the current models/colors.
Thursday, May 23, 2019
Announcement: Condition Cards
I was smack in the development process for a few new production lines but that's been interrupted by active orders for the time being. I was able to get the new 5e Condition Cards though so those are now available here: https://www.etsy.com/ca/listing/708670043/dnd-5e-condition-cards

I've also added a variation to the Evil Dead 2 Harness so clients can select whether it comes with a hook or not at purchase.
In the meantime I've still got some prototypes limping along between orders and there's some pretty interesting projects I'll be digging into soon. Might be more to report before too long. =)

I've also added a variation to the Evil Dead 2 Harness so clients can select whether it comes with a hook or not at purchase.
In the meantime I've still got some prototypes limping along between orders and there's some pretty interesting projects I'll be digging into soon. Might be more to report before too long. =)
Tuesday, February 26, 2019
Shop Update: February
Got a few updates for February:
- New Listing: Adventure Maps! https://www.etsy.com/ca/listing/687140487/map-adventure
I've been working on these since the laser cutter came in and I'm excited to finally add them to the shop. I've always wanted to provide maps that could be used as tabletop props and these are proving perfect for that! - Dice Cup Updates
- A bunch of the classic dice cups have new images now that their designs have been updated
- I've added a Monster Manual dice cup with some of the art from the 1E era
- The old DMG design has been reworked to be a straight Githyanki design
Meanwhile, I'm actively working on some new updates for March. I have new status tokens and a DM Screen in active development and new dice cup designs that should be hitting the shop in the next couple months.
Saturday, February 2, 2019
Shop Update: Coins Overhaul
I've been meaning to do this for months so during a recent review of my Etsy policies I broke out the coins as separate listings. This means buyers can assemble their own allotments of 5e currency without going through me to ring up a custom order. And it's been working pretty swell so far! I'm going to have the printer churning out coins well into April at this rate. ^_^


CP: https://www.etsy.com/ca/listing/679551591/dnd-5e-currency-copper-pieces-cp
SP: https://www.etsy.com/ca/listing/679552489/dnd-5e-currency-silver-pieces-sp
EP: https://www.etsy.com/ca/listing/665713464/dnd-5e-currency-electrum-pieces-ep
GP: https://www.etsy.com/ca/listing/665713760/dnd-5e-currency-gold-pieces-gp
PP: https://www.etsy.com/ca/listing/665713988/dnd-5e-currency-platinum-pieces-pp
At the same time I've been working on updating all my listings to make sure the thumbnails are consistent. I've got a long docket of designs and patterns to overhaul to make good use of the laser so with any luck I'll have another big update in Feb.


CP: https://www.etsy.com/ca/listing/679551591/dnd-5e-currency-copper-pieces-cp
SP: https://www.etsy.com/ca/listing/679552489/dnd-5e-currency-silver-pieces-sp
EP: https://www.etsy.com/ca/listing/665713464/dnd-5e-currency-electrum-pieces-ep
GP: https://www.etsy.com/ca/listing/665713760/dnd-5e-currency-gold-pieces-gp
PP: https://www.etsy.com/ca/listing/665713988/dnd-5e-currency-platinum-pieces-pp
At the same time I've been working on updating all my listings to make sure the thumbnails are consistent. I've got a long docket of designs and patterns to overhaul to make good use of the laser so with any luck I'll have another big update in Feb.
Wednesday, January 2, 2019
New Year, New Laser Cutter
Way back in 2016 I decided to invest in a Glowforge laser cutter. If you're unfamiliar with Glowforge, they were trying to make the giant, room-sized laser cutters used industrially a little more home friendly. They certainly succeeded at that but the four figure price tag and long production delays are probably going to keep them from becoming a routine household item. Those delays, combined with the ~30 miles from here to the border, are why I just received my Glowforge right after New Years when they've been shipping in the US for a couple of years now.

 The box is pretty huge and finding a place to stow it (so I can safely pack the thing if/when we move someday) is going to be a challenge. Fortunately I've been keeping a spot open for the laser ever since I'd learned it was on its way. In essence the laser's just going to burn away material and that makes for a fair amount of exhaust. So there's a hose I can drop out the nearby window to direct that exhaust safely outside and avoid the worst of the burnt hair/char smell that comes with firing a 40W CO2 laser beam at leather.
 The Glowforge is really pretty optimized for working on flat materials that'll fit in its 11x20 bed. My primary purpose in procurring the laser was to score the drafts and designs I make directly onto leather without going through the whole messy ink transfer business. I knew this would work in principle but that's still a far cry from knowing it works in practice. I was able to test it pretty quickly with a shoulder strap and it worked every bit as well as I'd hoped.


Maps are a helluva lot more complex than a monogram though and they're the most susceptible to the foibles of ink transfers. So I took an opportunity to update our wall of past campaign maps by adding Barovia. All the laser cutter's really doing here is taking the draft I make on the computer and tracing it onto the leather. Then I come along and do all the carving and staining that makes it a neat looking map. Barovia's a little bit of a weird map for this with it's topography but I was really happy that all the teeny, tiny little buildings came out awesomely.
 And, of course, a laser can do more than etch lines on leather. I have a few ideas for new product lines to work on this year. First up was a personal project though. For a long time I've wanted to have some woodsy pictures of the dogs I've had so over a weekend I was able to process some old photos and burned them into some wood to make an awesome little triptych. I did a little manual "post processing" to bring the dogs out of the background more but I'm quite happy with how these turned out. And once I figure out some details (like material supply >_<) I'm looking forward to putting a similar product up on the shop.


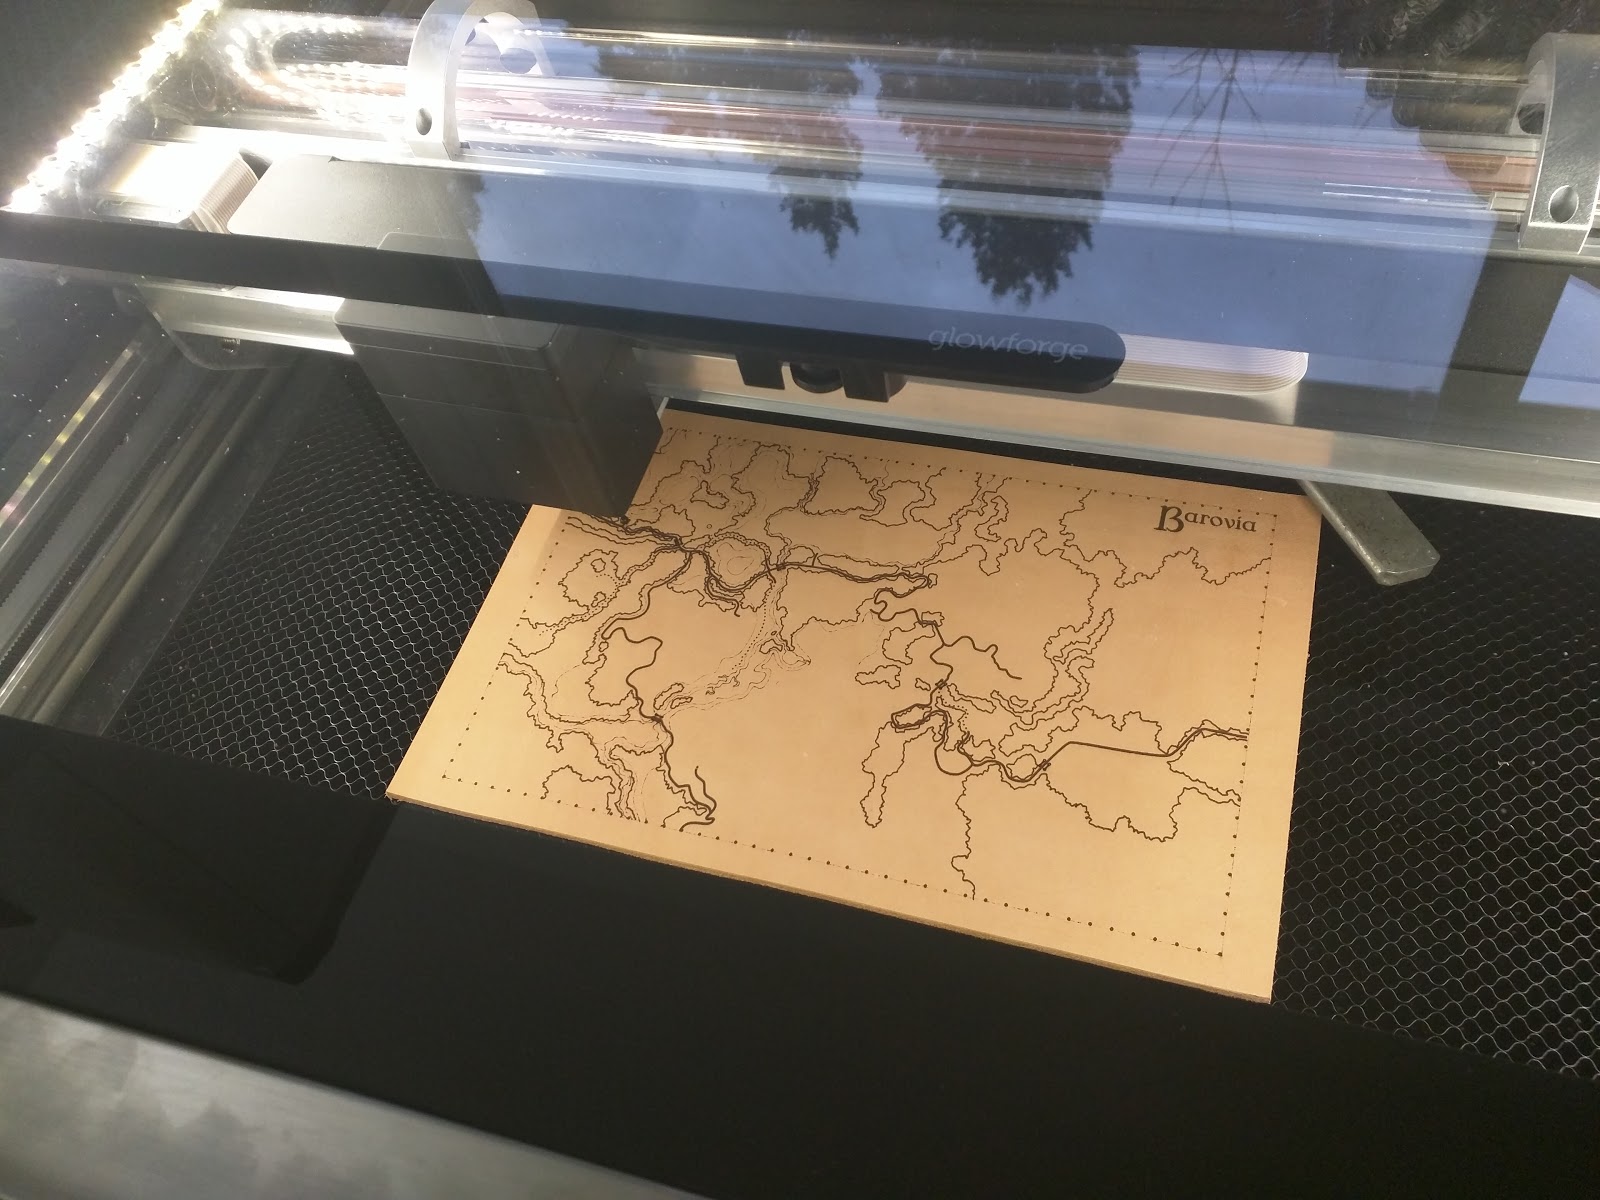


Maps are a helluva lot more complex than a monogram though and they're the most susceptible to the foibles of ink transfers. So I took an opportunity to update our wall of past campaign maps by adding Barovia. All the laser cutter's really doing here is taking the draft I make on the computer and tracing it onto the leather. Then I come along and do all the carving and staining that makes it a neat looking map. Barovia's a little bit of a weird map for this with it's topography but I was really happy that all the teeny, tiny little buildings came out awesomely.

Saturday, August 18, 2018
We're back!
It's been a hair over two weeks and I'm back up and running! I've been able to ship a couple small orders already and I'm hoping to clear the rest of the docket over the next couple of weeks.
Meanwhile I have a shiny new workshop. In the old place my work space was split across two rooms but here I've been able to pack it all into one big room. I'm still working on lighting but the giant window keeps the place pretty bright during the day so it's not an imminent concern. I'm sure I'll juggle things around on the pegboard too. For now I'm just happy everything fits in one place and I can keep my stock in a nice safe closet.
I took the opportunity to build a new photo booth from scratch to replace the old backdrop. The backdrop wasn't a bad idea and I liked how it looked but it clearly wasn't meant for close-up photography and it hasn't weathered all that well. These whitewashed boards on the other hand should weather very well! Shouldn't be long before I can start posting products on it.


Meanwhile I have a shiny new workshop. In the old place my work space was split across two rooms but here I've been able to pack it all into one big room. I'm still working on lighting but the giant window keeps the place pretty bright during the day so it's not an imminent concern. I'm sure I'll juggle things around on the pegboard too. For now I'm just happy everything fits in one place and I can keep my stock in a nice safe closet.
I took the opportunity to build a new photo booth from scratch to replace the old backdrop. The backdrop wasn't a bad idea and I liked how it looked but it clearly wasn't meant for close-up photography and it hasn't weathered all that well. These whitewashed boards on the other hand should weather very well! Shouldn't be long before I can start posting products on it.


Tuesday, July 31, 2018
Moving
It's been a couple years since we moved into this place and it's worked pretty well for us since then. Even so, we've decided to move again for family reasons and that's been progressing in pretty short order. So far as work goes I'll be wrapping up production on as many orders as I can by tomorrow so I can focus on moving. I'm hoping to be set up and running at the new place within a couple weeks. I certainly don't want to repeat the 3-4 months of being offline from when we moved in here so I'm amply motivated to get back online asap!
Monday, March 5, 2018
Yet another new printer
A little over a year ago my first printer, a M3D Micro, burned out. That wasn't a huge surprise since M3D, at least in my experience, was running more a sham than a successful kickstarter program. That first printer required a ton of maintenance and even then getting a successful, much less good, print was more luck than anything. It failed even as a trial/introduction printer.
So I replaced it with another small printer to test it's applicability, MonoPrice's redundantly named Mini Select. It was another cheap printer aimed at household use but it had the noteable advantage of being reliable. You could give it the same print more than once and reasonably expect it to come out the same way. I developed a lot of nifty things, notably the prop coins, on that little printer. Then it too died a couple of weeks ago. I was troubleshooting a sensor issue and in power cycling the printer there was a short that released the "magic smoke." That would've been covered by the warranty but it'd expired a couple weeks earlier.
In any case, the MonoPrice definitely succeeded in helping me test how I could use a 3D printer for the shop. I was able to print tools, tap-offs, and products as needed. That gave me the information I needed to decide to invest in a full-size production printer. After a bunch of research I picked a Lulzbot TAZ6. I've been printing with it for about week now and I'm really happy with it. The detail is a lot finer and more consistent than either of the previous printers. And the build volume is about 11" cube. It's huge!

I'm looking forward to developing some really neat products with this thing. In particular I think this'll let me bring back the old DM Toolboxes. Those were a popular line I had to retire because they took too much labor with finicky results. Thanks to this thing's huge build volume though I could print the entire structure of the box as one piece of plastic. Wrap that in leather and it should be good to go!
So I replaced it with another small printer to test it's applicability, MonoPrice's redundantly named Mini Select. It was another cheap printer aimed at household use but it had the noteable advantage of being reliable. You could give it the same print more than once and reasonably expect it to come out the same way. I developed a lot of nifty things, notably the prop coins, on that little printer. Then it too died a couple of weeks ago. I was troubleshooting a sensor issue and in power cycling the printer there was a short that released the "magic smoke." That would've been covered by the warranty but it'd expired a couple weeks earlier.
In any case, the MonoPrice definitely succeeded in helping me test how I could use a 3D printer for the shop. I was able to print tools, tap-offs, and products as needed. That gave me the information I needed to decide to invest in a full-size production printer. After a bunch of research I picked a Lulzbot TAZ6. I've been printing with it for about week now and I'm really happy with it. The detail is a lot finer and more consistent than either of the previous printers. And the build volume is about 11" cube. It's huge!

I'm looking forward to developing some really neat products with this thing. In particular I think this'll let me bring back the old DM Toolboxes. Those were a popular line I had to retire because they took too much labor with finicky results. Thanks to this thing's huge build volume though I could print the entire structure of the box as one piece of plastic. Wrap that in leather and it should be good to go!
Sunday, January 21, 2018
Now adding: Leather Journals!
I made four or five prototypes of different books and journals last year in order to land on this pattern for production. I'm really very happy with it. I've been using the first of these journals (brown one with the armadillo) for my notes in our current campaign and it's been working pretty great. We recently hosted my parents while they visited from San Antonio. The blue journal is one my Mother and I built together and it came out super well! That particular one's not for sale (because it's back home in San Antonio by now) but the journals themselves are finally up on the shop. Looking forward to making more over the course of the year.


Wednesday, January 3, 2018
Catching up in the New Year
Whew! That was a whirlwind of a holiday season. I've got two months of blurbs to retro-actively write but, in my defense, I was averaging ~70 hour work weeks for much of the season. There were some very interesting orders in there that I'm looking forward to turning into posts.
Overall 2017 was a pretty great year, at least professionally. I'm still crunching numbers but the numbers I would want to go up are all going up. For the next couple of weeks I'm figuring out the best ways to continue that progress and "manage my success" in a way that doesn't result in a 3 week backlog. To that end I'm making some changes to the D&D coins, both to improve the consistency and speed they can be produced, as well as adding a few new listings during January. Unfortunately I had to retire the DM Toolbox listing since it just takes too long to produce the way I've been doing it. I have some ideas on how to improve the design and the speed so hopefully by Fall I can introduce a new-and-improved version of the Toolbox.
Carving cowskins doesn't have much in common with soothsaying but it's looking like 2018's going to be an even better year for Foster Leathercraft!
Overall 2017 was a pretty great year, at least professionally. I'm still crunching numbers but the numbers I would want to go up are all going up. For the next couple of weeks I'm figuring out the best ways to continue that progress and "manage my success" in a way that doesn't result in a 3 week backlog. To that end I'm making some changes to the D&D coins, both to improve the consistency and speed they can be produced, as well as adding a few new listings during January. Unfortunately I had to retire the DM Toolbox listing since it just takes too long to produce the way I've been doing it. I have some ideas on how to improve the design and the speed so hopefully by Fall I can introduce a new-and-improved version of the Toolbox.
Carving cowskins doesn't have much in common with soothsaying but it's looking like 2018's going to be an even better year for Foster Leathercraft!
Monday, February 6, 2017
The New & Improved 3D Printer
As previously discussed my "old" M3D printer had a disappointing existence until a couple weeks ago when it gave up the ghost. It could have been revived with a $50 part (plus ~$30 for shipping) but I'd pretty much had my fill of it. The most valuable thing I got from that printer was probably the lesson to check fan forums for a thing before buying that expensive thing. In fairness to me that wasn't an option when I bought the M3D (since it wouldn't start shipping for ~8 months after that).

That wasn't a problem with the new printer. Monoprice's Select Mini has a fair few reviews spread around the internets. The fan forums point out a few valid issues (mostly with parts that are easily replaceable) but on the whole the impression is very positive. It's not a perfect printer, or a top of the line printer. But it is a "Pretty Good" printer made better by some solid construction and a low price point. It's pretty rough around the edges, especially when it comes to its documentation, but I would argue that this printer is doing a much better job of achieving M3D's mission of a "household" printer. It's a good entry level printer but if you're new to 3D printing you should probably expect to spend some time googling to find the common procedures that aren't described in the manual (things like changing filament, printing over USB, etc).
 I mostly used the M3D for making tap-offs that I used to create other things. In the course of their duty tapoffs get smashed between a rock and a heavy maul so they don't always last very long. The example above is the tapoff used to making the burning tokens for the 5e Condition sets. The one on the left is the old tapoff from the M3D. You can see the gaps in the surfaces, the bumps on curves, the general sloppiness. That was the best I could ever get out of that printer. On the right you see the exact same model printed on the "Monomini". This was the first print I pulled off that printer and in addition to being much sharper and smoother, I suspect it'll last a lot longer too.

Tap-offs are all well and good but they won't show us the limits of what a printer can and can't do. Anyone who's been following my twitter account for a few years might remember that time I tried to print a dragon and got more an ooze. I think the picture pretty much speaks for itself.

I dug that same file out of Thingiverse so I could try it again on the new printer. I think this does a pretty good job of showing the printer's limits. It's a vast improvement over the ooze-dragon but there's still some gaps and issues. In fairness to the printer, a lot of those were probably because I printed it at about 1/2 the intended scale and those wings were pretty thin to start with. If I fiddled with the model and built in some better supports then I'm pretty sure I could get a clean, ~100mm tall dragon with nice clean wings.
All in all I'm pretty happy with the new printer and I expect ya'll can expect to see more prints popping up across the store.

That wasn't a problem with the new printer. Monoprice's Select Mini has a fair few reviews spread around the internets. The fan forums point out a few valid issues (mostly with parts that are easily replaceable) but on the whole the impression is very positive. It's not a perfect printer, or a top of the line printer. But it is a "Pretty Good" printer made better by some solid construction and a low price point. It's pretty rough around the edges, especially when it comes to its documentation, but I would argue that this printer is doing a much better job of achieving M3D's mission of a "household" printer. It's a good entry level printer but if you're new to 3D printing you should probably expect to spend some time googling to find the common procedures that aren't described in the manual (things like changing filament, printing over USB, etc).


Tap-offs are all well and good but they won't show us the limits of what a printer can and can't do. Anyone who's been following my twitter account for a few years might remember that time I tried to print a dragon and got more an ooze. I think the picture pretty much speaks for itself.

I dug that same file out of Thingiverse so I could try it again on the new printer. I think this does a pretty good job of showing the printer's limits. It's a vast improvement over the ooze-dragon but there's still some gaps and issues. In fairness to the printer, a lot of those were probably because I printed it at about 1/2 the intended scale and those wings were pretty thin to start with. If I fiddled with the model and built in some better supports then I'm pretty sure I could get a clean, ~100mm tall dragon with nice clean wings.
All in all I'm pretty happy with the new printer and I expect ya'll can expect to see more prints popping up across the store.
Tuesday, January 24, 2017
RIP M3D Printer
The same month I opened the shop back in '14 I'd ordered a 3D printer from M3D. At the time they were being billed as an entry level printer that was simple and reliable enough for anyone to use for everyday anythings. In the year I spent waiting to receive the printer other initial adopters were receiving theirs and... well I suppose we could say the receptions were mixed. After shelling out the duties my total bill for this printer came pretty close to $500 when I finally received it in July 2015. And after all of that waiting and time my first attempts at printing were pretty disappointing to say the least.
 It took several months of tinkering, researching, and working out the kinks in the hardware and the software to finally start getting functional (not yet good, just functional) prints 7 out of 10 times. I learned that the spool had to be suspended over the printer to reduce any tension on the filament as much as possible. I also learned that if I wanted to scale my prints I needed to go through a complicated process of piping it through a separate piece of software before sending it to M3D's proprietary software. Funny story too since they sold the printer as being able to work with any open source software (it can't).

This list could go on for at least a few more points but the summary is this: If M3D's goal was to create an inexpensive printer that didn't require much maintenance and any layperson could use right away then they failed catastrophically. This wasn't helped by the impression that the closest thing they have to a support department are the forums where their customers are trying to figure out their own fixes. If you check the official M3D FAQ it's full of links to those forums.
In fairness I did get a couple prints I would call "good" after the 1.5.1 version of the software was released last fall. And even the vast majority of prints weren't quite "good" they were good enough for most of what I needed to do. I was able to dress up the corners of the DM Toolbox with custom fit caps thanks to the printer. And I've printed lots of tap-offs, which was the original reason I invested in it, so it's been a success in that way.
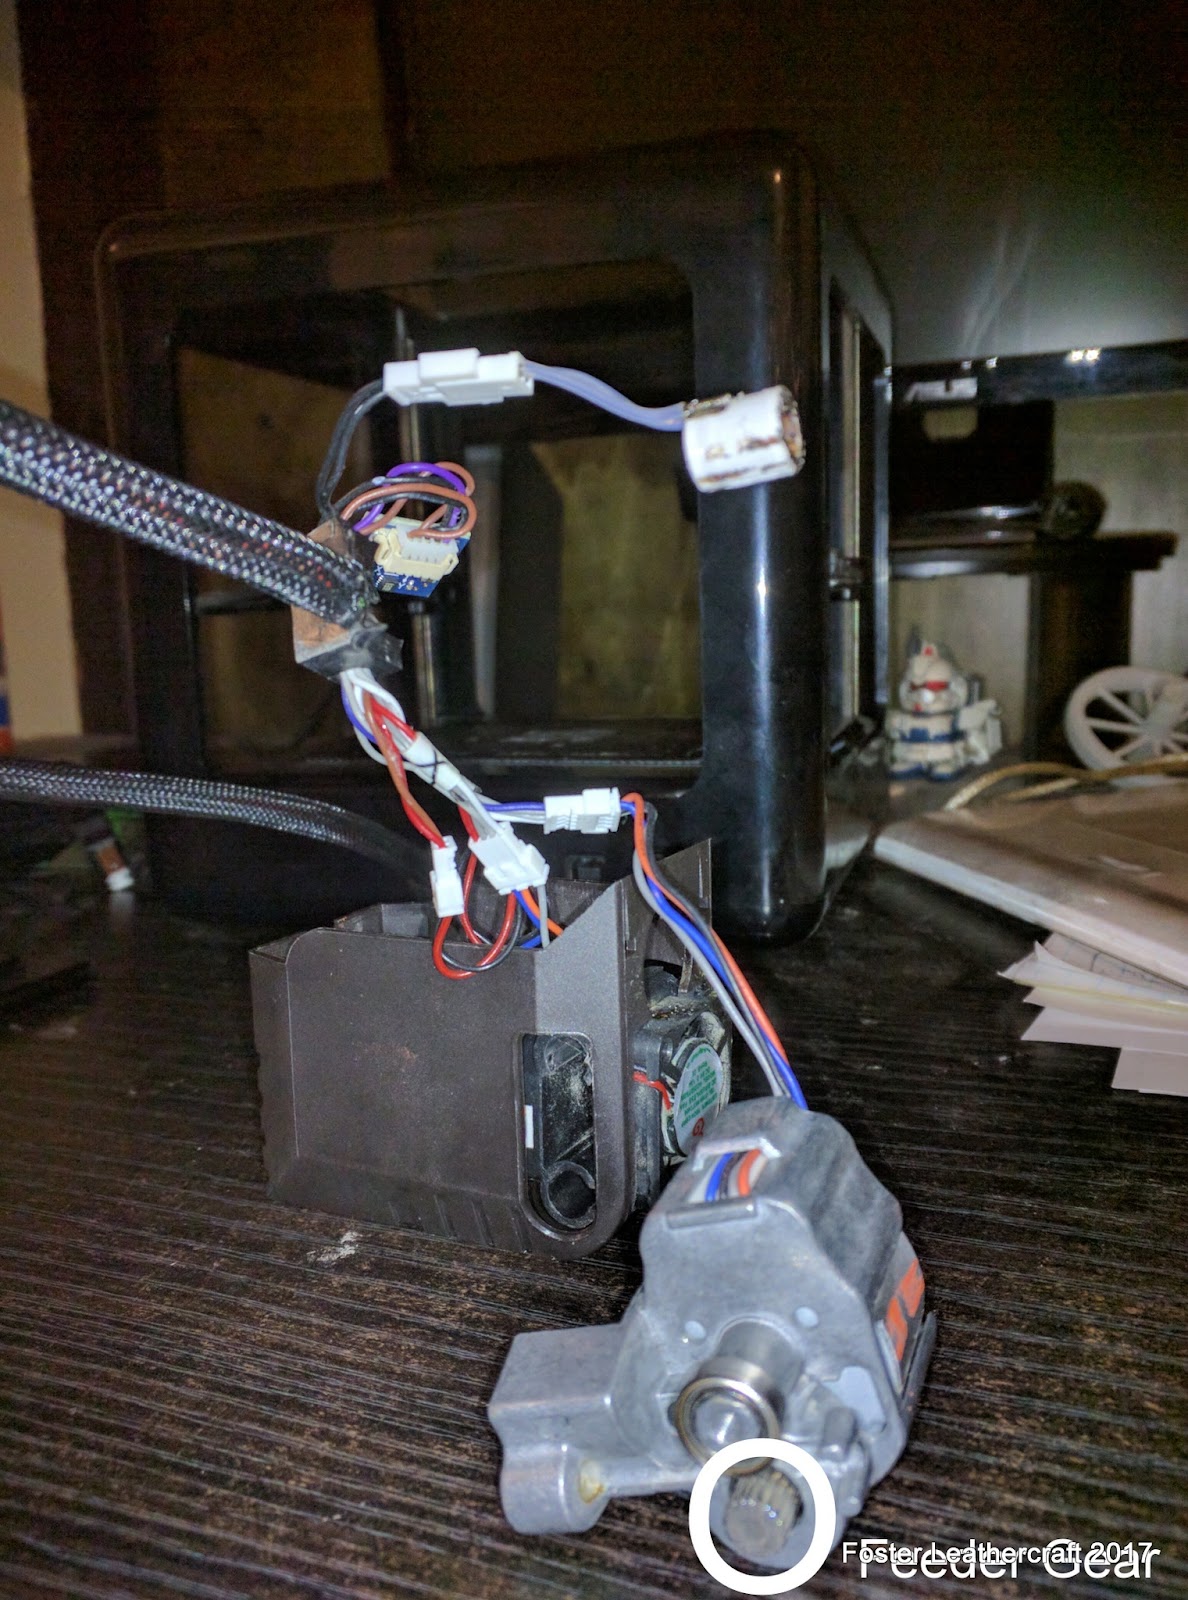
All of which brings me to now. As the title implies the M3D has effectively kicked the bucket. The feeder gear that pushes filament into the extruder has gotten wobbly and can't push the filament any longer. I could replace the entire assembly. This component is troublesome enough that M3D does sell it separately through their internal store. And the printer has worked just barely well enough that I functionally require a 3D printer now. But if the choice is between investing another hundred or so into this printer or five times that to entirely replace it with a different brand, it's a pretty easy choice for me to make.
 I don't yet know what I'll be replacing it with but it's definitely going to be a printer that's been out for a while. The Printr bots are a good contender but I'll be doing a full review of my options over the week before ordering something by Friday.


This list could go on for at least a few more points but the summary is this: If M3D's goal was to create an inexpensive printer that didn't require much maintenance and any layperson could use right away then they failed catastrophically. This wasn't helped by the impression that the closest thing they have to a support department are the forums where their customers are trying to figure out their own fixes. If you check the official M3D FAQ it's full of links to those forums.
In fairness I did get a couple prints I would call "good" after the 1.5.1 version of the software was released last fall. And even the vast majority of prints weren't quite "good" they were good enough for most of what I needed to do. I was able to dress up the corners of the DM Toolbox with custom fit caps thanks to the printer. And I've printed lots of tap-offs, which was the original reason I invested in it, so it's been a success in that way.
All of which brings me to now. As the title implies the M3D has effectively kicked the bucket. The feeder gear that pushes filament into the extruder has gotten wobbly and can't push the filament any longer. I could replace the entire assembly. This component is troublesome enough that M3D does sell it separately through their internal store. And the printer has worked just barely well enough that I functionally require a 3D printer now. But if the choice is between investing another hundred or so into this printer or five times that to entirely replace it with a different brand, it's a pretty easy choice for me to make.
Saturday, December 31, 2016
Closing out 2016
Whew! Well that was a year. On top of all the celebrity deaths there was that election that just tore the US up one side and down the other. They're calling it the year the Fact died, which is probably justified, but it's certainly been the year we've all read the obituary for Nuance. There's other blogs a plenty for the politics and world-changing stuff. If you can find a moderate outlet, especially if it's a moderate outlet for a "camp" other than yours, I'd invite you to delve into it. Call your representatives. Be reasonably skeptical and ask questions. And that's as politic-y as I'll get today.
It was a pretty enormous year for us too. In Feb I invested in a tool I don't expect to receive until the Fall quarter of 2017 but if half of what I read is accurate it'll be well worth the wait. Then at the start of April my wife and I moved out the small apartment we'd lived in for 4 years. We moved all of 5-6 blocks away into the ground floor of a house her parents had just purchased. I spent April through June renovating our new home and building furniture. It was a pretty intense time and as I was working around the clock on the house I wasn't able to spend any time producing things for the shop. This went on straight up to a family trip to Alberta at the end of June. Then as soon as we got back from that trip (the morning after we got back home) we zipped off to the pound and picked us up a pup: Imperious Maximus Prime.

So yeah, a busy year. The shop had been receiving more and more business at a relatively steady rate since I'd opened in the middle of 2014. Having to essentially shut down for 6 weeks reversed that trend pretty quickly. My fall quarter more or less bottomed out and I found myself back to the same pace of business I'd seen in 2014. I used the time to develop prototypes, catch my breath a bit, and teaching Max not to park at everyone else on the sidewalks. And all that work came with a significant upside: my work area was able to expand into two entirely dedicated spaces with custom built furniture. I expected that to make things easier, and it did, but I didn't expect how much faster it would make things too. It's been a huge boon.
And thankfully things kicked right back into the crazy-busy gear during the holiday season. I developed a set of tokens for tracking conditions in D&D based on feedback from the DMB community. I listed them just before the holidays and sold far more of them than any other item. The dice cups are moving pretty well too and things are looking pretty shiny heading into 2017.
I haven't finished crunching all the numbers yet but so far it's looking like, in terms of raw net numbers, the first and last quarters of 2016 were so good that I've still improved on 2015's numbers. I'll be looking to continue building on that in 2017. I want to expand the sets of tokens, build new pouches, refine the DM Toolbox, and do some more "artsy" things. Also maps. I don't think I'll ever not want to do maps.
It was a pretty enormous year for us too. In Feb I invested in a tool I don't expect to receive until the Fall quarter of 2017 but if half of what I read is accurate it'll be well worth the wait. Then at the start of April my wife and I moved out the small apartment we'd lived in for 4 years. We moved all of 5-6 blocks away into the ground floor of a house her parents had just purchased. I spent April through June renovating our new home and building furniture. It was a pretty intense time and as I was working around the clock on the house I wasn't able to spend any time producing things for the shop. This went on straight up to a family trip to Alberta at the end of June. Then as soon as we got back from that trip (the morning after we got back home) we zipped off to the pound and picked us up a pup: Imperious Maximus Prime.

So yeah, a busy year. The shop had been receiving more and more business at a relatively steady rate since I'd opened in the middle of 2014. Having to essentially shut down for 6 weeks reversed that trend pretty quickly. My fall quarter more or less bottomed out and I found myself back to the same pace of business I'd seen in 2014. I used the time to develop prototypes, catch my breath a bit, and teaching Max not to park at everyone else on the sidewalks. And all that work came with a significant upside: my work area was able to expand into two entirely dedicated spaces with custom built furniture. I expected that to make things easier, and it did, but I didn't expect how much faster it would make things too. It's been a huge boon.
And thankfully things kicked right back into the crazy-busy gear during the holiday season. I developed a set of tokens for tracking conditions in D&D based on feedback from the DMB community. I listed them just before the holidays and sold far more of them than any other item. The dice cups are moving pretty well too and things are looking pretty shiny heading into 2017.
I haven't finished crunching all the numbers yet but so far it's looking like, in terms of raw net numbers, the first and last quarters of 2016 were so good that I've still improved on 2015's numbers. I'll be looking to continue building on that in 2017. I want to expand the sets of tokens, build new pouches, refine the DM Toolbox, and do some more "artsy" things. Also maps. I don't think I'll ever not want to do maps.
Thursday, September 15, 2016
2016 Overhaul
I try to review all my listings and the blog at least twice a year, nominally in January and June. With the move and all the traveling around this year however it my review was pumped back a few... months. In any case, it's finished now and I was able to make lots of good changes:
Etsy store changes
* Shipping prices are now included in the price of an item. For custom orders I'll continue using the $12 flat rate or a $20 rate for particularly large or heavy items.
* Aside from including the postage, a lot of the prices have been tweaked to better reflect changing material costs.
* Brand names for product lines have been removed. I'm not sure how well they're really working but mostly this was about making titles more uniform across the store.
* Each listing has been sorted into a Section so they'll be a bit easier to browse.
* Several listings have had their pictures updated.
* A few listings have been retired, mostly for branding reasons.
* Any product with variations that affected price (e.g. padded vs unpadded shoulder pads) have been split into separate listings. Combined with the postage changes this means that the client will always see the final price right next to the item.
* New Listings have been posted (finally):
Blog changes
* The tags have been simplified by removing any tags referring to the material or color of an item.
* A new page has been added to the blog for Product Lines. This offers a quick summary of the items I'm routinely cranking out.
* The Materials and Commissions pages have been rewritten or edited to be a little clearer.
* Images from 2014 or older have been scaled down to meet Google Photos specs. More recent images might be scaled down in the future if I can find a method of doing that without having to back and manually relink them.
Still to come
There's still a list of items I'd like to add to the store, if only as demonstrations if not as recurring product lines.
Etsy store changes
* Shipping prices are now included in the price of an item. For custom orders I'll continue using the $12 flat rate or a $20 rate for particularly large or heavy items.
* Aside from including the postage, a lot of the prices have been tweaked to better reflect changing material costs.
* Brand names for product lines have been removed. I'm not sure how well they're really working but mostly this was about making titles more uniform across the store.
* Each listing has been sorted into a Section so they'll be a bit easier to browse.
* Several listings have had their pictures updated.
* A few listings have been retired, mostly for branding reasons.
* Any product with variations that affected price (e.g. padded vs unpadded shoulder pads) have been split into separate listings. Combined with the postage changes this means that the client will always see the final price right next to the item.
* New Listings have been posted (finally):
Blog changes
* The tags have been simplified by removing any tags referring to the material or color of an item.
* A new page has been added to the blog for Product Lines. This offers a quick summary of the items I'm routinely cranking out.
* The Materials and Commissions pages have been rewritten or edited to be a little clearer.
* Images from 2014 or older have been scaled down to meet Google Photos specs. More recent images might be scaled down in the future if I can find a method of doing that without having to back and manually relink them.
Still to come
There's still a list of items I'd like to add to the store, if only as demonstrations if not as recurring product lines.
- Sword Coast map 6x8
- Geeky Cuff (everyone does the Triforce or some video game logo. I'm looking for something D&D related that's maybe not a D20)
- Geeky Barrette (It's pretty common to see the defacto barrette kit carved up nicely. I'm thinking of making some from scratch, maybe in the shape of a dragon. What librarian wouldn't love a little psuedodragon to hug their hair bun?)
- Pencil Case (I'm sure I can do a lot better than the old model I used to have listed)
- Ooze minis (I'd printed a simple version of these for my own campaign. The printer makes it easy to scale the mini for when the ooze's split so once I finish revising the model it should be a nice addition to the store)
Thursday, June 23, 2016
Personal Projects
These don't really have anything to do with the shop but they've been part of home we've been building up here.
Towel Rack
 Our small bathroom came with a towel rack that might have been reasonably mistaken for a paper towel holder. Missus found it sufficiently a nuisance to come up with this replacement. We couldn't find any towel racks with a similar design so I knocked one together out of some shaker pegs and poplar boards. Not bad for ~$8 of material.
Hat Peg


 Every good hat should have a nice peg to call home. I'd been using a nail in the wall for the past couple months and reckoned it was time enough to change that. I used a cutoff from the Gaming Table and a wee shaker peg and treated it all with tung oil after sufficient sanding. There was a fair bit of discussion about the phrase to use on the board. I was initially going to use "I'm Not Home" and then it was going to be "I Rolled Out" and somehow we settled on "Rollin' Out" as the most applicable phrase. Either way I'm quite pleased that the hat can hang without mucking with the curvature of the brim.
With that we're pretty much done with the bulk of the work moving in. And just in time because tomorrow we're hoping in the car and driving to the next Province over. The Missus has some relations out that way we haven't visited yet and we'll be there to see the kick off of the Ponoka Stampede (Alberta's big rodeo event). Should be fun to drive through the Rockies and see a rodeo. I'll try to tweet some pictures along the way (from those islands of internet along the highway).
Towel Rack

Hat Peg


With that we're pretty much done with the bulk of the work moving in. And just in time because tomorrow we're hoping in the car and driving to the next Province over. The Missus has some relations out that way we haven't visited yet and we'll be there to see the kick off of the Ponoka Stampede (Alberta's big rodeo event). Should be fun to drive through the Rockies and see a rodeo. I'll try to tweet some pictures along the way (from those islands of internet along the highway).
Wednesday, June 22, 2016
Casing Chest
Casing is the process by which vegetable tanned leather is prepared for carving or molding. It involves wetting the leather and then creating the conditions for the water to work its way uniformly through the leather. As the name implies, this usually meant leaving the wet leather in a heavy box for several hours. Historically anything from an ice box to a humidor could work as a casing chest; it just had to be mostly air/water tight. These days the casing chest has often been replaced by ziploc bags and/or plastic wrap but there have been many times I've wanted to just have a big box I could drop my leather in to case (or keep it from decasing overnight). So, naturally, I built one.

Most of the chest is built from cedar tongue-and-groove boards that I could lock together to form the walls. I used some old 3/4" plywood we had sitting about for the floor and lid.
 Most of the descriptions of antique casing chests I could find (which totals two) described a heavy cedar chest lined with galvanized steel. The cedar I could handle but plates of galvanized steel were a tad outside my budget. So I've substituted it with HVAC tape (basically aluminum foil with a sticky side). To simplify the structure I ran a bead of hot melt glue down each groove between the boards. Then I ran some gorilla glue (which expands to fit the space available before hardening) over that and covered the whole kaboodle with the tape. After an hour or two the walls were basically flat.
 I was originally going to lock the whole thing together with some old
fashioned dovetails but that turned out to be impractical with the
tongue and grove boards so I settled for some simple butt joints. Once I had the floor installed and the first coat of tung oil applied I glued some strips of latigo to the upper edge of the chest. Aside from looking nicer than the ends of the boards, it should function as something like a gasket.
I was originally going to lock the whole thing together with some old
fashioned dovetails but that turned out to be impractical with the
tongue and grove boards so I settled for some simple butt joints. Once I had the floor installed and the first coat of tung oil applied I glued some strips of latigo to the upper edge of the chest. Aside from looking nicer than the ends of the boards, it should function as something like a gasket.

After a second coat of tung oil I cut the window in the lid and glued a big sheet of plexiglass under it. I was concerned early on that a big, dark box with lots of humidity and little air flow would soon gather mold. There are some "classic" solutions to this problem (periodically scrubbing with vinegar and the like) but I figured if the box wasn't constantly dark then it might not be a problem to start with. Time will tell if my hypothesis is correct and if it isn't... well I know where to find the vinegar.
I still need to find a pair of hinges that will fit the lid but the box is effectively finished as it is. When I find the hinges I can just bolt them on. The chest was sized so that it could fit inside the shelves in the Studio but putting it in there keeps it in shadow and limits how far the lid can be opened. Fortunately I had enough wallspace left to bolt a small shelf to the wall. Done & Done. I'm looking forward to trying it out on my next carving project.


Most of the chest is built from cedar tongue-and-groove boards that I could lock together to form the walls. I used some old 3/4" plywood we had sitting about for the floor and lid.


I still need to find a pair of hinges that will fit the lid but the box is effectively finished as it is. When I find the hinges I can just bolt them on. The chest was sized so that it could fit inside the shelves in the Studio but putting it in there keeps it in shadow and limits how far the lid can be opened. Fortunately I had enough wallspace left to bolt a small shelf to the wall. Done & Done. I'm looking forward to trying it out on my next carving project.


Monday, June 20, 2016
Move Update V
It's been a very long time coming but the Studio is finally finished and ready for working in. It's been just about two months now (April to June) since we moved in to the new place and this is really the last room to be set up. It's spent most of the past couple months being gutted by contractors and turned into some place habitable, much less workable. I have photos of most of that progress but for the sake of brevity I think I'll give the before and after and then discuss some of the "features" of my new setup.


The previous tenant had been using the space for "gak" storage. The walls were finished with aluminum siding, the furniture was... questionable, and the lighting came from an ancient CFL that seemed to take 3-8 hours to warm enough to stop flickering.
 The siding has been replaced with proper drywall and painted up nicely. The single CFL fixture has been replaced with two rail systems sporting 3 LEDs a piece. Essentially the entire room is one big light box (great for photography). I installed some vinyl floor tiles so we're not walking on bare concrete all the time. It's not in this photo but there's also a bright red D20 rug in front of the door now (because it's entirely appropriate).


 And here's where the real work happens. I have my old workbench holding up all the new hardware bins, a pegboard so I can actually reach my various carving tools, and a bench tall enough that I can carve for hours on end without contorting my back. I haven't gotten to use it too much yet the work I have done has been far, far nicer than it was back in the apartment.
Before:


After:


The shelving makes for some handy storage, mostly for my shipping materials. I've built a photo booth across the time so that I can have a consistent background for my photos. The color came out a bit differently than I was expecting but it works pretty well. It's 8' long so I don't have to worry as much about angles or bundling up straps to get them in one shot.

The bench and cabinet across from the shelves is a dedicated space for staining. I was initially trying to keep it white and clean but it's already got some stains on it and it is basically just a workbench. It might seem redundant but having separate benches specialized for cutting, carving, and staining is turning out to be incredibly useful.

Subscribe to:
Posts (Atom)